(ZT)Threading in Delphi and Microsoft .NET Framework
posted by BO @ 1:49 PM
0 comments
![]()
![]()
Dayang 's Blog
 -->
-->

Recently, I was building multi-threaded applications and noticed some intermittent data inconsistency. Soon, I found the culprit was locking mechanism. After doing some research, I gathered the following information and as usual decide to share with you guys.
Sharing variables among multiple concurrent threads may lead to data inconsistency. To overcome data inconsistency, we usually apply locking mechanism on shared variables. The lock keyword is used to lock a variable. Once a variable is locked, it will be not be available to other thread until the current thread is done using it. Locking is pretty safe in most of the cases but there are cases when locking may not be the safe solution. Some of these cases are incrementing and decrementing the value of a variable and exchanging two variables with each other. These operations seem atomic operations but actually there are not.
For example, the following code increments the value of counter:
lock(this)
{
counter++;
}
Usually, the increment or decrement operations include three steps:
The problem with the above code snippet is, a thread can preemptive after first two steps and another thread can start the execution before the incremented value of the variable is saved back in the variable from the register. In the mean time, second thread can go ahead and execute all three steps. After that first thread executes the thread step and overwrites the value of the counter variable. Now the operation executed by second thread is lost.
So how do we can we avoid this scenario? This is where interlocking comes in. The System.Threading.Interlock class provides members that can be used to increment, decrement values and exchange data between two variables. The Interlock class provides atomic operations in variables that are shared among multiple concurrent threads.
The above code snippet can be replaced with the following:
System.Threading.Interlock.Increment(counter);
The Interlock class provides following four static methods. All of these methods perform atomic operations:
Recommendations:
Use Interlock class methods for incrementing, decrementing, and exchange operations.
posted by BO @ 1:44 PM
0 comments
![]()
![]()
Caching is the most effective technique you can use to improve the performance of your ASP.NET web application. Designing your application with caching in mind, improves both the performance and the scalability of that application.
Caching is about storing data in memory the first time it is requested and then re-using it for the following requests for a specified period of time.
ASP.NET provides you with two types of caching that you can use to create a high performance web application. The first type is application caching in which you can store application's data in server memory for subsequent requests without recreating them each time. This saves the time and the resources of your application. The second type is output caching. In this type you can save or let us say you can cache dynamic pages and / or user controls for subsequent requests without the need to execute them everytime.
In this tutorial we will explore those caching techniques, in addition to some new features available only in ASP.NET 2.0
To download the complete example we will discuss in this tutorial, please click here.
ASP.NET provides an easy to use caching mechanism. Simply, you can store data that require extensive server resources to be created. By caching this data you are creating it once and then using it many time without recreating that data again. This can improve your application performance significantly.
You can cache your application data by using the cache class. The instance of this class is private to each application. The life time of this class is the life time of the application itself. The cache object is recreated each time the application is restarted. The cache object is global, means the data stored in it is available anywhere within the web application, and in this regard this is similar to the application object. The difference between the cache object and the application object is that the cache object has some more powerful features that allows you to control the cached data.
With the cache object, each item or data stored in the cache object can have its priority state, and can have an expiration time. The Cache object uses those two features in situation like this: When your system's memory becomes scarce, the cache object chooses items with low priority or seldom use to remove and this frees memory. This is how the cache object ensures that unnecessary items does not consume valuable server resources.
Storing Data in the Cache object
You can store data in the cache object using several approaches: using simple assignment, using the 'Add' method, and using the 'Insert' method.
Here's some lines of code that demonstrate the 3 approaches:
    7         If Not IsPostBack Then
    8             ' you can add a new item to the cache object by many ways:
    9             ' first by simple assignment
   10             Cache("Key1") = "This is text number 1"
   11             ' second by using the Add method
   12             Cache.Add("Key2", "This is text number 2", Nothing, _
   13              Caching.Cache.NoAbsoluteExpiration, _
   14              System.TimeSpan.FromMinutes(2), _
   15              CacheItemPriority.Default, Nothing)
   16             ' Third by using the insert method
   17             Cache.Insert("Key3", "This is text number 3")
   18         End If
You can store data in the cache object in the form of key-value pairs as shown in the previous example.
By using the 'Add' method you can set more parameters other than the key / value. You can set the expiration time, the priority, the dependency on another object, and a notification to your application to be sent when that key is deleted from the cache.
Using the 'Insert" method you can simply create a new key and assign a value to it. You can still optionally set other parameters like in the 'Add' method.
Retrieving Data from the Cache object
You can access the cached data by using their keys just like the 'Session' and 'Application' objects, but before attempting to retrieve a cached value you must check for its existence as shown in the following example:
   20         If Cache.Item("Key1") IsNot Nothing Then
   21             Label1.Text = Cache.Item("Key1")
   22         Else
   23             Label1.Text = "Cached item is removed"
   24         End If
If you run this code you will get the following:
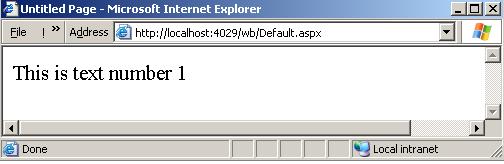
Figure 1
Removing Data from the Cache Object
To remove a given key from the cache object, just use the 'Remove' method and supply the name of the key you need to remove as in the following line of code.
20 Cache.Remove("Key1")If you now run the application after removing this key, you will get the following:
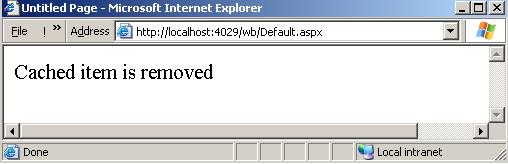
Figure 2
Responding to Removed Cached Data
When you use the 'Add' method or the 'Insert' method to add new data to your cache object, you can specify an 'OnRemove' callback function that will be called when the data is removed. This is the only event the cache object can provide.
To see how this could be done let's see the following example with the code associated with the callback is shown in boldface for more clarity.
    1 Imports System.Web.Caching
    2 Partial Class _Default

    3     Inherits System.Web.UI.Page

    4     Dim OnRemove As CacheItemRemovedCallback

    5     Protected Sub Page_Load(ByVal sender As Object, _
    6     ByVal e As System.EventArgs) Handles Me.Load
    7
    8         If Not IsPostBack Then
    9             OnRemove = New CacheItemRemovedCallback( _
   10             AddressOf Key2Removed)
   11             ' you can add a new item to the cache object by many ways:
   12             ' first by simple assignment
   13             Cache("Key1") = "This is text number 1"
   14             ' second by using the Add method
   15             Cache.Add("Key2", "This is text number 2", Nothing, _
   16              Caching.Cache.NoAbsoluteExpiration, _
   17              System.TimeSpan.FromMinutes(2), _
   18              CacheItemPriority.Default, OnRemove)
   19             ' Third by using the insert method
   20             Cache.Insert("Key3", "This is text number 3")
   21         End If
   22
   23         Cache.Remove("Key1")
   24
   25         If Cache.Item("Key1") IsNot Nothing Then
   26             Label1.Text = Cache.Item("Key1")
   27         Else
   28             Label1.Text = "Cached item is removed"
   29         End If
   30
   31     End Sub
   32     Public Sub Key2Removed(ByVal Key As String, ByVal Value As _
   33      Object, ByVal Reason As Caching.CacheItemRemovedReason)
   34         Application.Add("Status", "The cached item " + Key + _
   35          ": " + Value.ToString + " was " + Reason.ToString)
   36     End Sub
   37     Protected Sub Button_Key2_Click(ByVal sender As Object, _
   38      ByVal e As System.EventArgs) Handles Button_Key2.Click
   39         Label1.Text = Cache("Key2").ToString
   40         MsgBox("now the key2 will be removed from the cache object")
   41         Cache.Remove("Key2")
   42         Label1.Text = Application("status").ToString
   43     End Sub
   44 End Class
In the above code we declare an OnRemove callback function for the 'Key2' cached item and associate it with the 'Key2Removed' subroutine which stores the removed item key and value plus the reason of removal in an application state key called 'Status'.
Then, we add a button control named 'Button_Key2' and activate its 'OnClick' event handler. In this handler we display the value stored in the 'Key2' cached item, then we display a text box that says that this item will be removed from the cache object now. After the user click on the 'Ok' button of this text box the application state item 'Status' will be displayed indicating that the 'Key2' cached item is already removed from the cached object. You can display and review the complete code if you download the complete example from this link.
ASP.NET allows you to cache web pages or portions of them, calling this an output caching. By caching frequently requested pages or portions of them, you can substantially increases your web server throughput and get a fast page response. You can cache pages on devices like: the web browser making the request, the web server responding to the request, and any other cache capable devices such as proxy servers. There are two ways you can use for output caching: declaratively in a page / a configuration file, or programmatically using a cache API.
Using the OutputCache Directive
You can use the @OutputCache directive to cache your web page or form in a declarative way. The OutputCache directive has the following attributes:
Duration: Specifies how long the page will be cached, measured in seconds.
Location: Specifies the device you will cache on. Can be: browser, server, or any. (The default is any)
CacheProfile: The name of the cache settings in the web.config file, to associate with the page. (this is optional)
NoStore: A Boolean value that indicate whether or not to allow or prevent secondary storage of sensitive information
Shared: A Boolean value that indicate whether or not the page output can be shared with multiple pages.
SqlDepandecy: A String value that identifies a string of database name and a table name associated with the output cache of this page or control.
VaryByParam: a semi colon delimited list of strings that gives you the ability to cache multiple responses from a single web form
VaryByControl: A semi colon delimited list of strings that gives you the ability to cache portions of web forms.
Let's now see some real code of how to cache an entire web page or web form ...
In the web form .aspx source view, add the following code:
    1 <%@ Page Language="VB" AutoEventWireup="false"
    2 CodeFile="Default2.aspx.vb" Inherits="Default2" %>

    3 <%@ OutputCache Duration="60" Location="Server" VaryByParam= "None" %>
The above code caches only one response of the entire web page or form for a duration of 60 seconds on the server.
When the web form is requested for the first time, the server creates it and stores it for subsequent requests. After 60 seconds the cached page will expire. If the page is requested after that expiration time, the server will recreate it again and store it for another 60 seconds, and so on.
You can use OutputCache's other attributes to cache multiple responses of a single web form using the VaryByParam attribute. You can cache portions of web forms using the VaryByControl attribute.
Caching with code
The above technique shows you how to cache a web form using the OutputCache directive in a declarative way, now we will explain how you can do the same task using code.
The following code demonstrate how to use caching programmatically.
    5     Protected Sub Page_Load(ByVal sender As Object, _
    6     ByVal e As System.EventArgs) Handles Me.Load
    7
    8         Label1.Text = "this web form will be cached " + _
    9         Now().ToString
   10         ' set Duration
   11         Response.Cache.SetExpires(Now.AddSeconds(20))
   12         ' Set Location
   13         Response.Cache.SetCacheability(HttpCacheability.Server)
   14         ' Set VaryByParam
   15         Response.Cache.VaryByParams("None") = True
   16
   17     End Sub
The above code is, simply, equivalent to the following line:
3 <%@ OutputCache Duration="20" Location="Server" VaryByParam= "None" %>
Refer to the online copy of Microsoft Developers Network at http://msdn.microsoft.com or use your own local copy of MSDN.
posted by BO @ 8:19 AM
0 comments
![]()
![]()
Developing a web application that responds to users requests quickly is a target and a challenge for all web developers. ASP.NET was designed with speed optimization and performance improvements in mind. The set of enhancements like: Pages compilation, and Automatic storage on the server are new to ASP.NET. However, these enhancements are not enough to protect you from slow performance when a large number of http requests are simultaneously processed by your web application.
To write a well performing web application you must make a balance between four common performance measures. These measures are:
Execution Time: It is the time taken to process a request. This is measured as the time elapsed between the first byte received from the server and the last one.
Response Time: It is the time between issuing a request and the first byte received as a response from the server.
Scalability: It measures the performance of a web application against resources (memory, processors, or computers) allocated for it.
Throughput: It is the number of requests your application can serve in a time unit, usually a second.
What follows is a list of areas that you can invoke to harvest for techniques that you can use to develop a high performance ASP.NET application.
State management
Data access
Page and server controls
Web applications
Coding practices
In what follows we will cover the first two areas. Part 2 covers the last three areas, and caching techiniques are deeply explained in Caching optimization.
The following issues give you some ideas about how to make state management efficient.
SessionState State
Disable session state when you are not using it. Not all web application require a session state for each user. When you disable unneeded session state you are definitely improving your application performance.
To disable session state for a complete page in your application, use the following code:
<%@ page EnableSessionState="false" %>
If your page requires access to session variables only to read them then set the session state for this page to read only.
To disable session state for the entire application, open the 'web.config' file, and set the mode attribute to off under the session state section as in the following code:
<SessionState mode="off" />
There are more than one approach for storing your session state data. You can choose the approach you prefer by setting the mode attribute under the session state section of your application 'web.config' file. The supported modes are: in-process mode, state server mode, SQL server mode, and custom mode. Each mode is suitable in some circumstance, and has its own set of advantages. The in-process session state is by far the fastest one. So, it is recommended to use the in-process provider if you want to store small amounts of volatile data in the session state. Other state server and SQL server providers are needed if your application using a web farm or garden, or if you want to retain your session state date if the web server is restarted.
The following points give you some ideas about how to render data access efficient:
Use SQL server provider
Among the data providers available to be used, choose SQL data provider to build a high performance, scalable web application.
Use SQL Data Reader
The SQLDataReader class gives you the ability to read only retrieved records from the database for once. So, if this is all what you actually need, then it is extremely recommended to use a data reader class instead of a DataSet or, a Table Class. This will gives your application much higher performance.
Use Stored Procedures
Whenever possible use compiled stored procedure instead of SQL plain text commands, this gives your application an extra speed performance. SQL server builds and stores execution plans for previously stored procedures.
Make use of SQLDataSource useful properties
Instead of writing a query that includes the "Where", or "Sort By" clauses use the caching, filtering, and sorting properties of the SQLDataSourse provider. You can set the SQLDataSource object's "EnableCaching" property to true to enable caching of the retrieved data by this data source. When you enable data source caching, SQLDataSource will do the operations like filtering and sorting on the cached data. You can use the "FilterExpression" property, and the "SortParameterName" property to perform filtering and sorting using the SQLDataSource object. This will certainly makes your application faster.
View State Encryption
You must balance between the importance of encrypting your application view state data to make your transferred data more secure, and the cost / the impact of using encryption on your application speed. Encryption has a fixed cost for initialization plus a unfixed cost depends on the size of data to be encrypted. In brief, it is recommended to avoid using unnecessary view state data encryption.
Paging
It is known that to display data from a given data source you have to use data controls like: GridView, and/or DetailsView controls and to bind them to the data source you want to display data from. You may want to adjust the display layout of some data records and columns within your screen by using the GridView, or the DetailsView paging property and set it to true. This paging technique is called UI paging (User Interface paging). To perform this service, the GridView control requests data from the specified data source, it then filters the elements that will be displayed in the current page and simply ignores the rest. It does this process each time a new page is required ... which is certainly a great waste of resources.
There is another technique for doing the same task, it is typically referred to as data source paging. In this technique you make use of a data source control that implements the DataSourceView class, and set its CanPage property to true, then you feed the GridView control or the DetailsView control from this data source. In this case the data source object queries only for the elements needed in each page. Thus, data source paging is more efficient than UI paging. The only data source class that allows data source paging is ObjectDataSource class.
Caching
Using the caching technique appropriately can improve the performance of your application more than using any other technique. .Net framework provides some mechanisms for caching pages and data within your ASP.NET application. You can use caching for pages that exhibit heavy traffic and do not change between requests. You can also cache small sized data that is used extensively by your application instead of processing them each time.
To use caching effectively, give attention to the following notes:
- Don't assign a small duration for your cached items, items that expire quickly take extra cost for cleaning up and garbage collection.
- Don't cache too many data items, there is a memory cost for each data item. It is not necessary to cache items that can be easily calculated or those which are rarely calculated or used.
Caching is so important and the ASP.NET framework gives a varity of caching mechanisms you can use to improve your application performance more and more. Some of those mechanisms are: Caching application data, Page output casching, Caching web forms, and Caching parts of web forms.
Refer to the online copy of Microsoft Developers Network at http://msdn.microsoft.com or use your own local copy of MSDN.
(Part 2)
In part 1 of this tutorial we mentioned five areas under which we can classify the techniques that can be used to optimize web application performance. In part 1 we explained the fist two areas only. Here we are going to cover the following remaining 3 sections:
- Page and server controls
- Web applications
- Coding practices
The following topics give you an idea about how to use pages and controls efficiently in your web application:
Use HTML controls whenever possible
HTML controls is lighter than server controls especially if you are using server controls with its default properties. Server controls generally is easier to use than HTML controls, and on the other side they are slower than HTML controls. So, it is recommended to use HTML controls whenever possible and avoid using unnecessary server controls.
Avoid round trips to server whenever possible
Using server controls will extensively increase round trips to the server via their post back events which wastes a lot of time. You typically need to avoid these unnecessary round trips or post back events as possible. For example, validating user inputs can always (or at least in most cases) take place in the client side. There is no need to send these inputs to the server to check their validity. In general you should avoid code that causes a round trip to the server.
The Page.IsPostBack Property
The Page.IspostBack Boolean property indicates whether this page is loaded as a response to a round trip to the server, or it is being loaded for the first time. This property helps you to write the code needed for the first time the page is loaded, and avoiding running this same code each time the page is posted back. You can use this property efficiently in the page_load event. This event is executed each time a page is loaded, so you can use this property conditionally to avoid unnecessary re-running of certain code.
Server Control's AutoPostBack Property
Always set this property to false except when you really need to turn it on. This property automatically post back to the server after some action takes place depending on the type of the control. For example, in the Text Control this property automatically post back to the server after the text is modified which is a great deal of processing cost and hence much slower performance and most importantly a poor user experience.
Leave Buffering on
It is important to leave page buffering in its on state to improve your page speed, unless you have a serious reason to turn it off.
Server Controls View State
Server control by default saves all the values of its properties between round trips, and this increases both page size and processing time which is of course an undesired behavior. Disable the server control view state whenever possible. For example, if you bind data to a server control each time the page is posted back, then it is useful to disable the control's view state property. This reduces page size and processing time.
Methods for redirection
There are many ways you can use to redirect a user from the current page to another one in the same application, however the most efficient methods to do this are: the Server.Transfer method or cross-page posting.
The following topics give you some tips about how to make an efficient web application:
Precompilation
When an already deployed ASP.NET web application page is requested for the first time, that page needs to be compiled (by the server) before the user gets a response. The compiled page or code is then cached so that we need not to compile it again for the coming requests. It is clear that the first user gets a slow response than the following users. This scenario is repeated for each web page and code file within your web site.
When using precompilation then the ASP.NET entire web application pages and code files will be compiled ahead. So, when a user requests a page from this web application he will get it in a reasonable response time whatever he is the first user or not.
Precompiling the entire web application before making it available to users provides faster response times. This is very useful on frequently updated large web applications.
Encoding
By default ASP.NET applications use UTF-8 encoding. If your application is using ASCII codes only, it is preferred to set your encoding to ASCII to improve your application performance.
Authentication
It is recommended to turn authentication off when you do not need it. The authentication mode for ASP.NET applications is windows mode. In many cases it is preferred to turn off the authentication in the 'machin.config' file located on your server and to enable it only for applications that really need it.
Debug Mode
Before deploying your web application you have to disable the debug mode. This makes your deployed application faster than before. You can disable or enable debug mode form within your application's 'web.config' file under the 'system.web' section as a property to the 'compilation' item. You can set it to 'true' or 'false'.
The following topics give you guidelines to write efficient code:
Page Size
Web page with a large size consumes more bandwidth over the network during its transfer. Page size is affected by the numbers and types of controls it contains, and the number of images and data used to render the page. The larger the slower, this is the rule. Try to make your web pages small and as light as possible. This will improve response time.
Exception Handling
It is better for your application in terms of performance to detect in your code conditions that may cause exceptions instead of relying on catching exceptions and handling them. You should avoid common exceptions like null reference, dividing by zero , and so on by checking them manually in your code.
The following code gives you two examples: The first one uses exception handling and the second tests for a condition. Both examples produce the same result, but the performance of the first one suffers significantly.
    8         ' This is not recommended.
    9         Try
   10             Output = 100 / number
   11         Catch ex As Exception
   12             Output = 0
   13         End Try
   14
   15         ' This is preferred.
   16         If Not (number = 0) Then
   17             Output = 100 / number
   18         Else
   19             Output = 0
   20         End If
Garbage Collector
ASP.NET provides automatic garbage collection and memory management. The garbage collector's main task is to allocate and release memory for your application. There are some tips you can take care of when you writing your application's code to make the garbage collector works for your benefit:
Avoid using objects with a Finalize sub as possible and avoid freeing resources in Finalize functions.
Avoid allocating too much memory per web page because the garbage collector will have to do more work for each request and this increases CPU utilization (not to mention you can go out of memories in larger web applications)
Avoid having unnecessary pointers to objects because this makes these objects alive until you free them yourself within your code not in an automatic way.
Use Try / Finally
If you are to use exceptions anyway, then always use a try / finally block to handle your exceptions. In the finally section you can close your resources if an exception occurred or not. If an exception occurs, then the finally section will clean up your resources and frees them up.
String Concatenation
Many string concatenations are time consuming operations. So, if you want to concatenate many strings such as to dynamically build some HTML or XML strings then use the System.Text.StringBuilder object instead of system.string data type. The append method of the StringBuilder class is more efficient than concatenation.
Threading
If your application contains some operation that consumes time and resources, then instead of blocking the application flow awaiting for this process or operation to be finished it is recommended to create a separate thread for this blocking operation. By threading you will save your application normal flow from delays. Examples of time consuming operations that can be moved to another thread other than the main program thread are: querying on a database and waiting for results, and extensive IO operations.
Refer to the online copy of Microsoft Developers Network at http://msdn.microsoft.com or use your own local copy of MSDN.
posted by BO @ 8:18 AM
0 comments
![]()
![]()
http://www.west-wind.com/WebLog/posts/13132.aspx
(ZT)
http://webproject.scottgu.com/CSharp/Migration2/Migration2.aspx
posted by BO @ 7:28 PM
0 comments
![]()
![]()